Google Social App User Guide
Ivan.filho (Talk | contribs) |
|||
| Line 23: | Line 23: | ||
| − | Enable both APIs clicking | + | Enable both APIs by clicking Enable. |
[[File:Social-apps-google-4.png| 500px]] | [[File:Social-apps-google-4.png| 500px]] | ||
| Line 35: | Line 35: | ||
| − | Access "Credentials" tab and click on "Create credentials" > "OAuth client ID". Select "Web application" type, fill a name for this client, add the | + | Access "Credentials" tab and click on "Create credentials" > "OAuth client ID". Select "Web application" type, fill a name for this client, add the CoffeeBean URIs to "Authorized JavaScript origins" and "Authorized redirect URIs" and Create your OAuth client: |
::Authorized JavaScript origins: https://app.socialidnow.com | ::Authorized JavaScript origins: https://app.socialidnow.com | ||
| Line 48: | Line 48: | ||
| − | == Create Custom | + | == Create Custom Login App == |
| − | Access your | + | Access your account at https://app.socialidnow.com/. Open the dropdown of your account and click on "Social Apps". |
[[File:Social-apps-select-social-apps.png| 720px]] | [[File:Social-apps-select-social-apps.png| 720px]] | ||
| Line 58: | Line 58: | ||
[[File:Social-apps-social-app-type.png| 600px]] | [[File:Social-apps-social-app-type.png| 600px]] | ||
| − | Choose a name for your Social App and provide the Client ID and Client Secret from the created Google OAuth Client. At this point, you can | + | Choose a name for your Social App and provide the Client ID and Client Secret from the created Google OAuth Client. |
| + | |||
| + | At this point, you can request permission for each piece of information you want to capture from Google Account when users log in using your Social App. With all set, just click on "Create the Social App" to get your Custom Google Social App. | ||
[[File:Social-apps-google-8.png| 600px]] | [[File:Social-apps-google-8.png| 600px]] | ||
Latest revision as of 14:14, 9 May 2019
Contents |
Requirements
To create a Google Login you must have a Google account, if you already have one, you can skip the registration form:
New Project
Access the Google for Developers page:
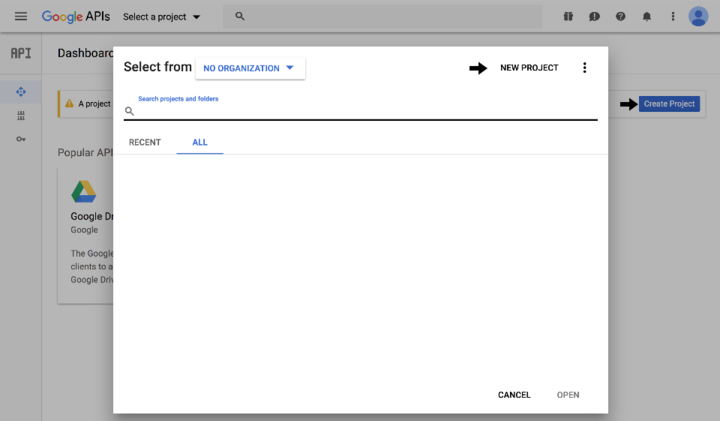
Click on "Create a Project" or open the Project selector and click on "New Project"
Provide your Project's Name
Enable APIs
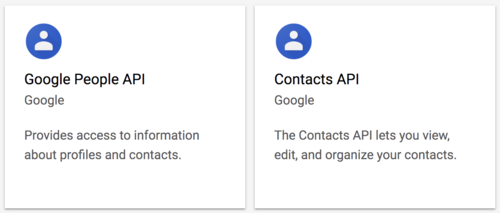
Click on Project Selector, select the created project and then click on "Enable APIs and Services". At the search field, look for "Google People API" and "Contacts API".
Enable both APIs by clicking Enable.
Credentials
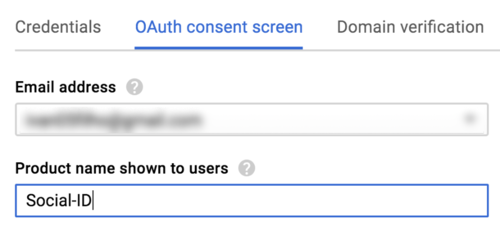
At the Side Bar Menu go to "APIs & Services" > "Credentials". Access the "OAuth consent screen", provide at least the "Product name" and then save it.
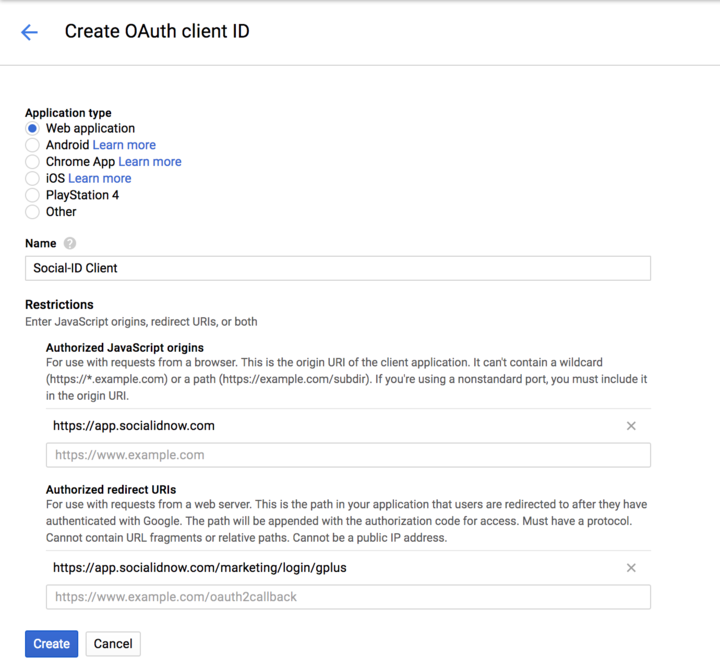
Access "Credentials" tab and click on "Create credentials" > "OAuth client ID". Select "Web application" type, fill a name for this client, add the CoffeeBean URIs to "Authorized JavaScript origins" and "Authorized redirect URIs" and Create your OAuth client:
- Authorized JavaScript origins: https://app.socialidnow.com
- Authorized redirect URIs: https://app.socialidnow.com/marketing/login/gplus
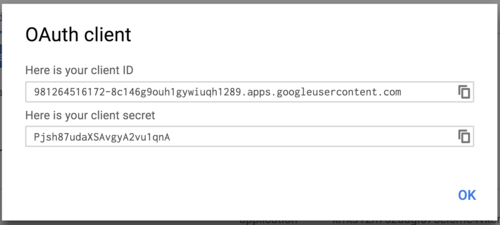
When created, a modal will be displayed and will provide your app id and app secret (which can be accessed by clicking on the created OAuth Client). When demanded, provide these credentials at the Social-ID platform.
Create Custom Login App
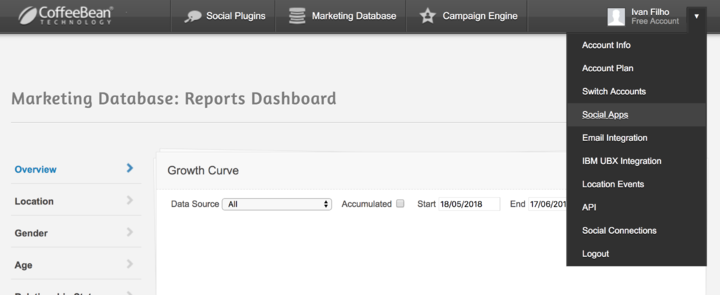
Access your account at https://app.socialidnow.com/. Open the dropdown of your account and click on "Social Apps".
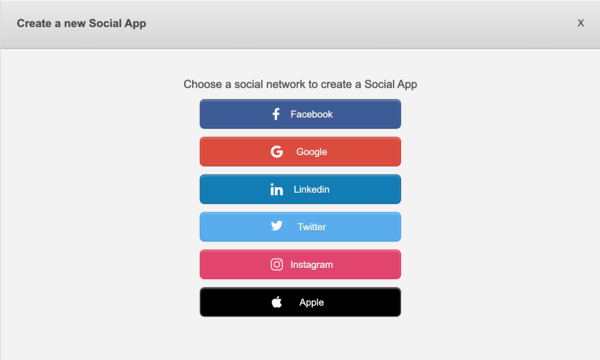
Click on "Add a new Social App" and select Google type.
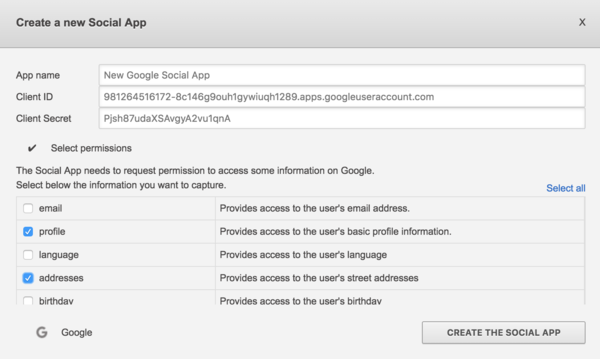
Choose a name for your Social App and provide the Client ID and Client Secret from the created Google OAuth Client.
At this point, you can request permission for each piece of information you want to capture from Google Account when users log in using your Social App. With all set, just click on "Create the Social App" to get your Custom Google Social App.
