Huawei CloudCampus
This guide was created using the following components:
- Controller: Huawei CloudCampus
- AP model: AP2051DN-E
Contents |
Requirements
In order to test your captive portal settings in the CloudCampus controller you'll need to configure a site and at least one device (AP) to broadcast the guest portal SSID.
Design > Device Management
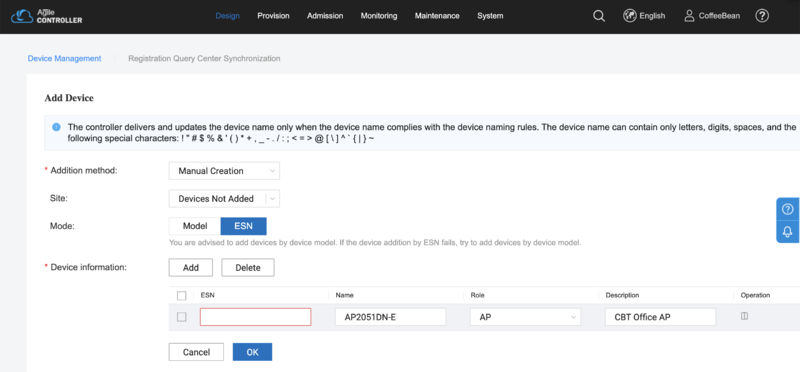
To add devices, go to "Design" and "Device Management". Click in "Add Device" button and input the required information. You can add devices by Model or ESN (serial number):
Design > Site Management
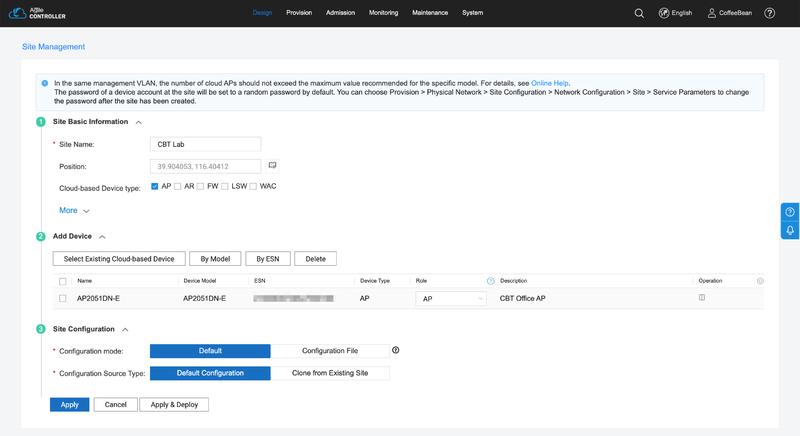
Choose "Design" and "Site Management" from the main menu. Click in "Create" and input the following information:
- Site Name: the name of your site.
- Add Device: select the device added previously.
- Site Configuration: keep the default settings.
Click in "Apply".
Now you'll start to configure the captive portal settings.
Design > Template Management
Choose "Design" and "Template Management" from the main menu.
ACL
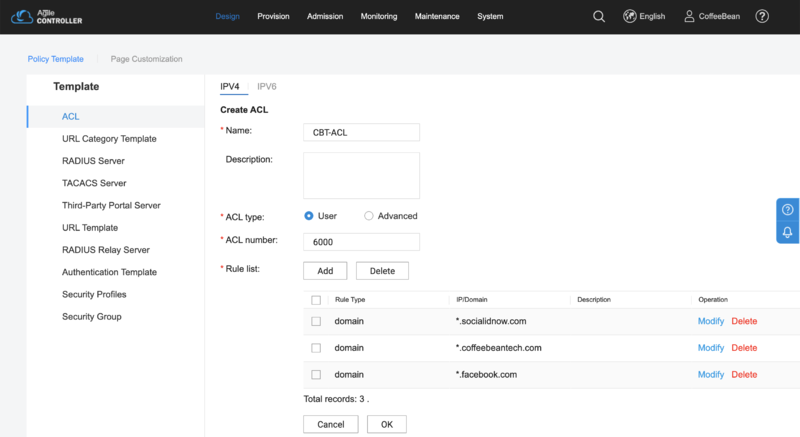
In the sidebar menu, choose "ACL". Click in "Create" and input the following settings:
- Name: CBT-ACL
- ACL type: choose "User"
- ACL number: 6000
- Rule list: add one entry to each domain you need to enabled in the walled garden. See Walled Garden for the Social Login as reference.
Click in "OK" to save the settings.
URL Template
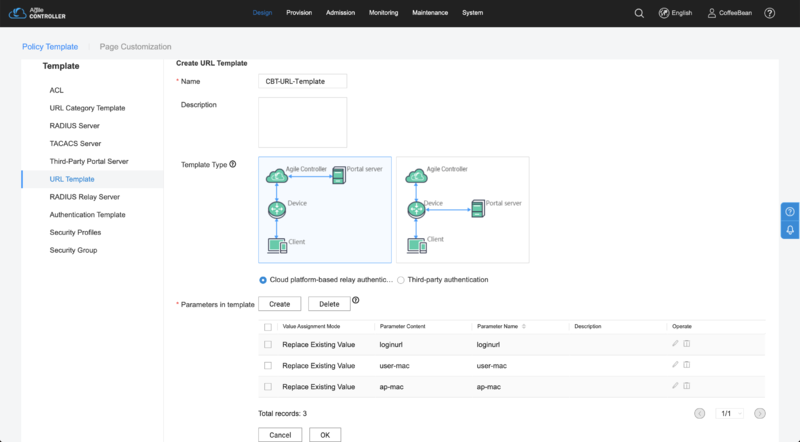
In the sidebar menu, choose "URL Template". Click in "Create" and input the following settings:
- Name: CBT-URL-Template
- Template Type: choose "Cloud platform-based relay authentication"
- Parameters in template: create the following entries:
- 1. Value Assignment Mode: Replace Existing Value
- 1. Parameter Content: ap-mac
- 1. Parameter Name: ap-mac
- 2. Value Assignment Mode: Replace Existing Value
- 2. Parameter Content: user-mac
- 2. Parameter Name: user-mac
- 3. Value Assignment Mode: Replace Existing Value
- 3. Parameter Content: loginurl
- 3. Parameter Name: loginurl
Click in "OK" to save the settings.
RADIUS Relay Server
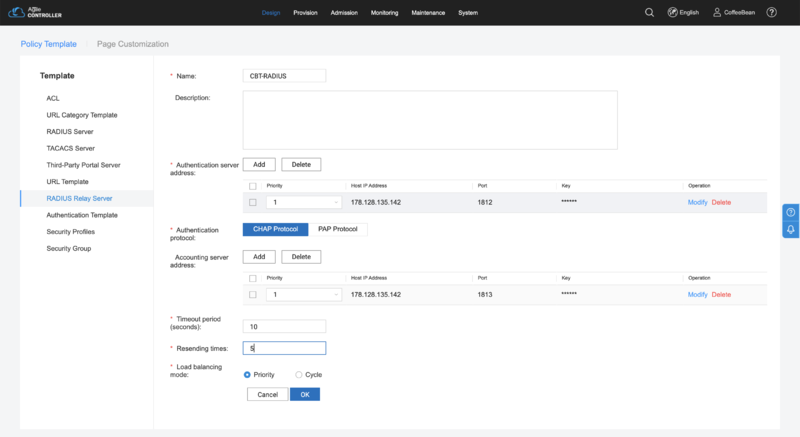
In the sidebar menu, choose "RADIUS Relay Server". Click in "Create" and input the following settings:
- Name: CBT-RADIUS
- Authentication server address:
- Host IP Address: The RADIUS IP will depend on your environment/region. You can check the IP for your region at our Captive Portal Configuration Page
- Port: 1812
- Key: Use the Shared Secret provided by CoffeeBean
- Authentication protocol: select "CHAP Protocol"
- Accounting server address:
- Host IP Address: The RADIUS IP will depend on your environment/region. You can check the IP for your region at our Captive Portal Configuration Page
- Port: 1813
- Key: Use the Shared Secret provided by CoffeeBean
- Time period (seconds): 15
- Resending times: 5
- Load balancing mode: select "Priority"
Click in "OK" to save the settings.
Provision > Site Configuration
Choose "Provision" and "Site Configuration" from the main menu.
AP > SSID
In the sidebar menu, choose "Site" > "AP" > "SSID". Click in "Create" and start the wizard:
Basic Settings
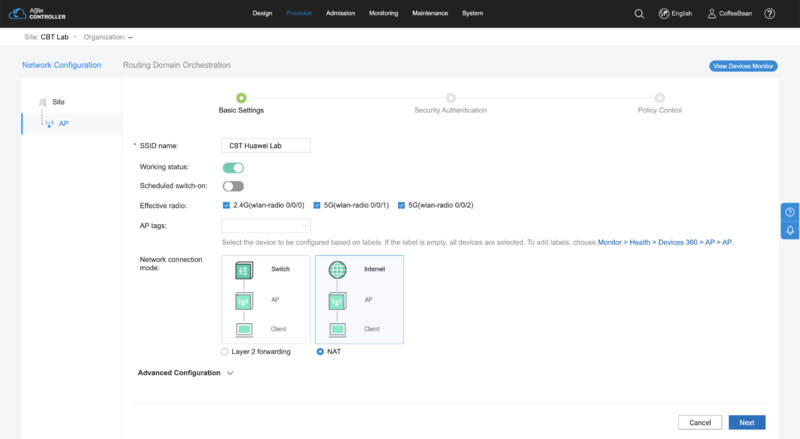
In the "Basic Settings" step input the following settings:
- SSID name: the name of your SSID (e.g.: "CBT Huawei Lab")
- Working status: enabled
- Network connection mode: choose "NAT"
Click in "Next".
Security Authentication
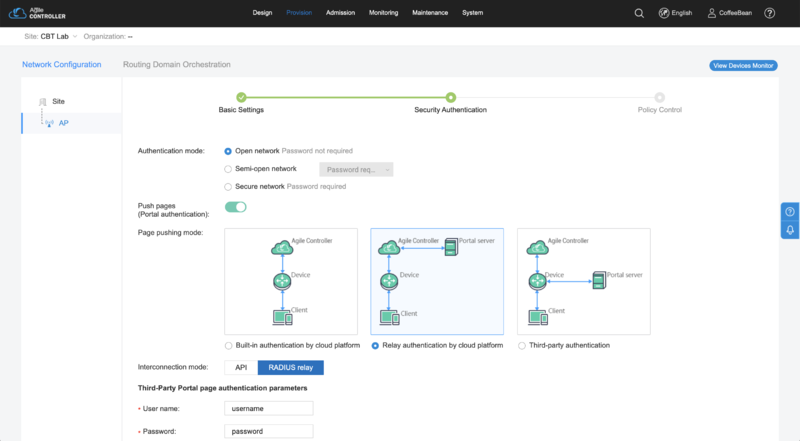
In the "Security Authentication" step input the following settings:
- Authentication mode: choose "Open network"
- Push pages (portal authentication): enabled
- Page pushing mode: select "Relay authentication by cloud platform"
- Interconnection mode: choose "RADIUS relay"
- Third-party Portal page authentication parameters:
- User name: username
- Password: password
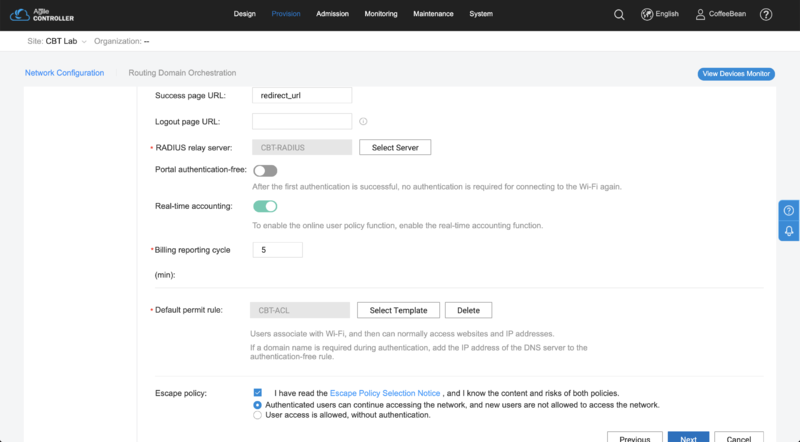
- Success page url: redirect_url
- RADIUS relay server: select the RADIUS relay server created previously (e.g.: "CBT-RADIUS")
- Real-time accounting: enabled
- Billing reporting cycle: 5 minutes
- Default permit rule: select the ACL created previously (e.g.: "CBT-ACL")
- Escape policy: choose "Authenticated users can continue accessing the network, and new users are not allowed to access the network." and check the "Escape Policy Selection Notice".
Click in "Next".
Policy Control
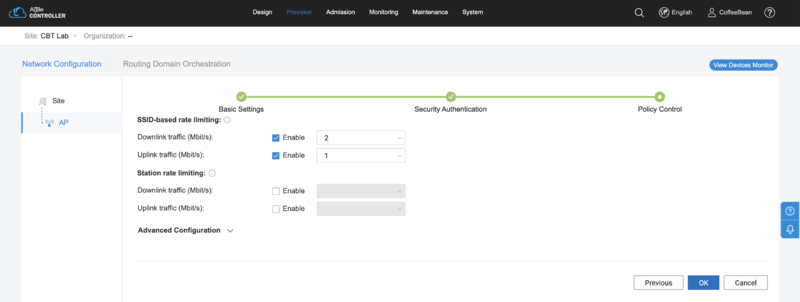
In the "Policy Control" step you can set your desired rate limit:
Click in "Ok" to finish the wizard.
Admission > Admission Policy
Now you can publish your captive portal settings. Choose "Admission" and "Admission Policy" from the main menu.
Portal Page Push Policy
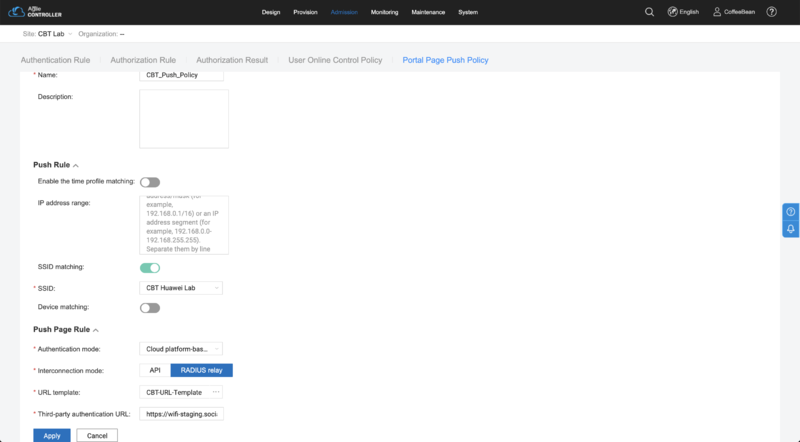
In the tab bar, choose "Portal Page Push Policy". Click in "Create" and input the following settings:
- Name: CBT_Push_Policy
- Push Rule
- SSID Matching: enabled
- SSID: select the SSID created previously (e.g.: "CBT Huawei Lab")
- Push Page Rule
- Authentication mode: choose "Cloud platform-based relay authentication"
- Interconnection mode: choose "RADIUS relay"
- URL template: choose the URL Template created previously (e.g.: "CBT-URL-Template")
- Third-party authentication URL: the provided captive portal login URL
Click in "Apply" to save and apply the settings.
Customer Parameters
The summary of customer specific parameters is:
- Design > Template Management
- ACL: get the list of domain you want to enable to unauthenticated users at our documentation.
- RADIUS Relay Server (Authentication/Accounting)
- Host IP Address: the RADIUS server IP according to your environment/region
- Key: Use the Shared Secret provided by CoffeeBean
- Admission > Admission Policy
- Portal Page Push Policy
- Third-party authentication URL: the provided captive portal login URL
- Portal Page Push Policy
