Ruckus ZoneDirector
Renato.neves (Talk | contribs) |
Renato.neves (Talk | contribs) |
||
| Line 58: | Line 58: | ||
* Encryption Options > Method: None | * Encryption Options > Method: None | ||
* Options > Hotspot Services: the previously Hotspot Service created (e.g.: "CP-SOCIAL-ID") | * Options > Hotspot Services: the previously Hotspot Service created (e.g.: "CP-SOCIAL-ID") | ||
| + | |||
| + | === WLAN Group === | ||
| + | |||
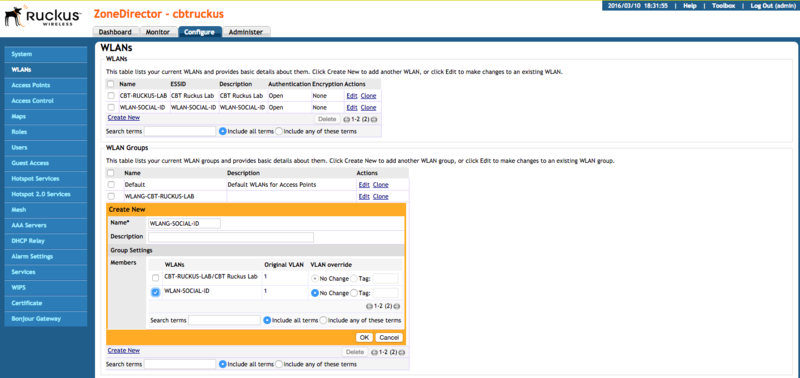
| + | You need to associate the previously WLAN with a WLAN Group. Probably you already have a "Default" one, but you can also create a new one and associate the previously WLAN as a "Member": | ||
| + | |||
| + | [[File:RuckusZD WLAN Group.png|800px]] | ||
== Configuring the Access Points == | == Configuring the Access Points == | ||
Revision as of 21:21, 10 March 2016
The following guide was created using a Ruckus wireless network with the following components:
- Controller: Ruckus ZoneDirector 1100
- AP: Ruckus ZoneFlex 7300 Series
- Firmware: 9.8.3.0 build 14
Note that this guide supports only firmware version 9.8+.
Contents |
Configuring the RADIUS server
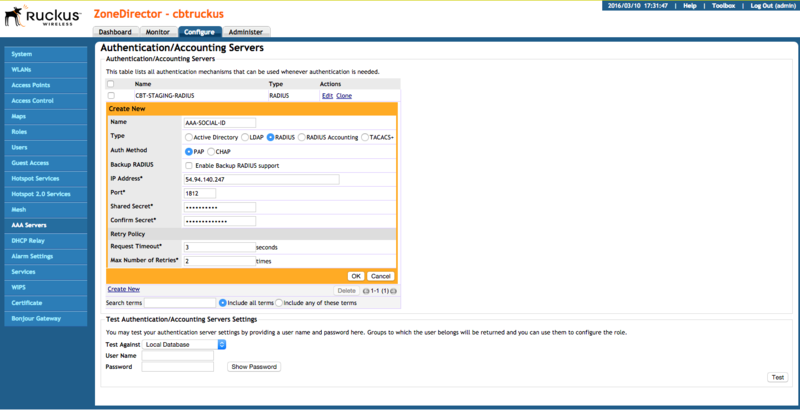
Configure the Social-ID RADIUS server by creating a new AAA Server.
Go to "Configure > AAA Servers", click in the "Create New" link and fill the name, such as "AAA-SOCIAL-ID":
Then fill the following info:
- Type: RADIUS
- Auth Method: PAP
- IP Address: 54.94.140.247
- Port: 1812
- Shared Secret: the provided RADIUS client secret
- Confirm Secret: the provided RADIUS client secret
Configuring the Hotspot service
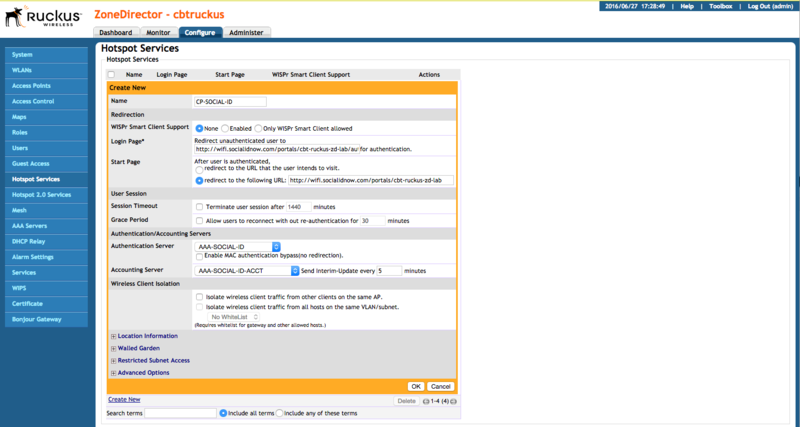
Go to "Configure > Hotspot Services", click in the "Create New" link and fill the Name, such as "CP-SOCIAL-ID":
Then fill the following info:
- Login Page: the provided captive portal login URL
- Start Page: select "redirect to the following URL:" and fill the provided captive portal start URL
- Authentication Server: the previously AAA Server created (e.g.: "AAA-SOCIAL-ID")
Walled Garden
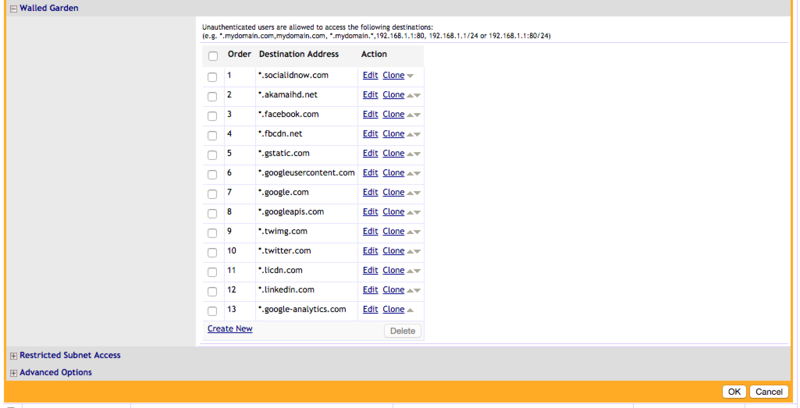
Allow Social-ID NOW platform URLs and social network URLs by configuring the Hotspot Walled Garden destinations.
Add the entries according to Walled Garden for the Social Login URLs:
Configuring the WLAN
Now you need to create a Wireless LAN with the Hotspot Service previously created.
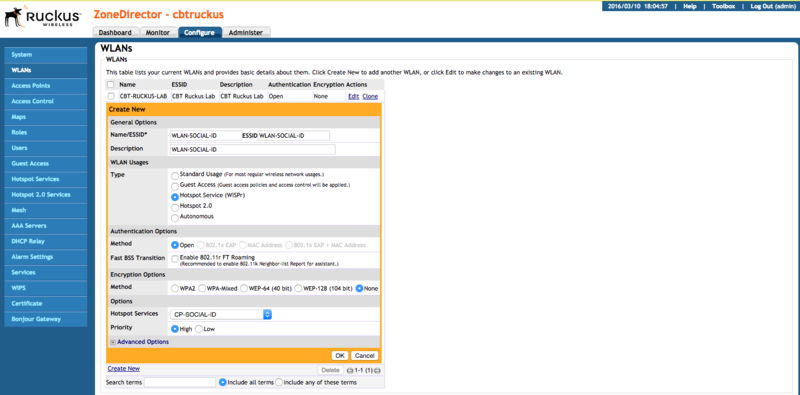
Go to "Configure > WLANs", click in the "Create New" link and fill the Name, such as "WLAN-SOCIAL-ID":
Then fill the following info:
- WLAN Usages > Type: Hotspot Service (WISPr)
- Authentication Options > Method: Open
- Encryption Options > Method: None
- Options > Hotspot Services: the previously Hotspot Service created (e.g.: "CP-SOCIAL-ID")
WLAN Group
You need to associate the previously WLAN with a WLAN Group. Probably you already have a "Default" one, but you can also create a new one and associate the previously WLAN as a "Member":
